Mastering Asynchronous Shell Operations in C#: A Visual C# Guide
Interacting with external applications is a fundamental requirement for many C# desktop and service applications. Whether you need to launch a utility, process a file with a third-party tool, or integrate with legacy systems, C# provides robust mechanisms to achieve this. The Microsoft .NET Framework’s System.Diagnostics.Process class is the cornerstone for managing external processes, offering comprehensive control over their lifecycle, from starting them to monitoring their execution and even terminating them. This guide delves into mastering these operations, particularly focusing on how your C# application can gracefully wait for shelled applications to complete their tasks.
Understanding the System.Diagnostics.Process Class
The Process class, found within the System.Diagnostics namespace, is your primary interface for interacting with system processes. It allows you to start, stop, control, and monitor processes on your local machine. This class is invaluable for scenarios where your application needs to orchestrate the execution of other programs, such as launching a text editor, running a command-line tool, or invoking a specific application for file processing.
Before you can leverage the power of the Process class, you must import its containing namespace. This ensures that your code can correctly reference and utilize all the functionalities provided by the System.Diagnostics library. Always place the using directive at the top of your code file, typically before any namespace or class declarations, to make these classes readily available.
using System.Diagnostics;
This simple line of code opens up a world of possibilities for inter-process communication and control within your C# applications. It’s the first step towards automating tasks and extending your application’s capabilities by integrating with the broader operating system environment.
Strategies for Waiting on Shelled Applications
When your C# application launches another program, a common requirement is to pause its own execution until the shelled application has finished. This ensures proper sequencing of operations and allows your C# code to react to the external process’s completion. There are primarily two robust strategies for handling this waiting period, each with its own advantages and suitable use cases.
The first approach involves waiting indefinitely for the external application to conclude its work or be manually closed by the user. This method is straightforward and ensures that your C# application does not proceed until the external task is genuinely finished. The second strategy introduces a time-out period, providing a mechanism to regain control in your C# application even if the shelled process takes too long or becomes unresponsive. This time-out functionality is crucial for building resilient applications that can gracefully handle unexpected delays or crashes in external programs.
Both approaches are vital tools in a developer’s arsenal, allowing for flexible and robust process management. The choice between them depends heavily on the specific requirements of your application and the expected behavior of the external process.
Waiting Indefinitely for the Shelled Application to Finish
In many scenarios, your C# application might launch an external program that must complete its execution before your C# code can proceed. This “wait indefinitely” approach is simple and effective, ensuring that subsequent operations in your C# program are only executed after the external task is truly finished. It’s particularly useful when the external process is critical to the workflow, such as an installer, a data processing script, or a specific document viewer.
Consider the example of launching Notepad to display a text file. Your C# application might need to ensure that the user has reviewed the document and closed Notepad before continuing with further operations. The Process class provides an elegant way to achieve this synchronous waiting behavior, blocking your application’s thread until the external process terminates. This method guarantees that your C# application remains in sync with the state of the shelled process.
The following code sample demonstrates how to start an application, specifically Notepad opening eula.txt, and then pause the current thread’s execution until Notepad is closed. This provides a clear, blocking mechanism to ensure sequential execution of tasks.
// How to Wait for a Shelled Process to Finish
// Get the path to the system folder.
string sysFolder = Environment.GetFolderPath(Environment.SpecialFolder.System);

// Create a new process info structure.
ProcessStartInfo pInfo = new ProcessStartInfo();

// Set the file name member of the process info structure.
// This specifies the application or document to open.
pInfo.FileName = sysFolder + @"\eula.txt";

// Start the process. This launches the application.
Process p = Process.Start(pInfo);

// Wait for the main window of the process to finish loading.
// This is important to ensure the UI is ready before attempting interactions.
p.WaitForInputIdle();

// Wait indefinitely for the process to end. This blocks the current thread
// until the launched application closes.
p.WaitForExit();

// Once the process has exited, this message box will be displayed.
MessageBox.Show("Code continuing...");
In this code:
* Environment.GetFolderPath(Environment.SpecialFolder.System) retrieves the path to the Windows system folder, where eula.txt often resides. This ensures portability across different Windows versions.
* ProcessStartInfo is a class that specifies the settings used to start a new process. It’s crucial for configuring how the external application is launched, including its file name, arguments, and window style.
* pInfo.FileName is set to the path of the executable or document to be opened. In this case, eula.txt will be opened by its default associated application (Notepad).
* Process.Start(pInfo) initiates the new process. This method returns a Process object, which represents the newly launched process and provides methods for controlling and monitoring it.
* p.WaitForInputIdle() is called to allow the process to enter an idle state, meaning it has finished processing its initial input and is ready to accept user input. This is particularly useful when you intend to interact with the application’s UI shortly after launching it, preventing race conditions.
* p.WaitForExit() is the core of this approach. It causes the calling thread to wait indefinitely until the associated process terminates. This method is synchronous and blocking, meaning your C# application will pause at this line until Notepad is closed by the user or terminates on its own.
* MessageBox.Show("Code continuing...") will only execute after Notepad has been closed, clearly demonstrating the blocking nature of WaitForExit().
This method is robust for situations where an external process must complete before your application can proceed. However, it comes with the risk that if the external application hangs or never closes, your C# application will remain blocked indefinitely. This is where the time-out approach becomes essential.
Providing a Time-Out for the Shelled Application
While waiting indefinitely can be useful, it’s often not the most resilient approach, especially in production environments. An external application might hang, crash, or simply take an unexpectedly long time to complete, leaving your C# application blocked indefinitely. To mitigate this risk and ensure your application remains responsive, implementing a time-out mechanism is crucial. This allows your C# code to regain control after a predefined period, even if the shelled application hasn’t finished its task.
The time-out mechanism provides a safety net, allowing your application to decide on a course of action—such as closing the unresponsive process—if the external program doesn’t respond within a specified time. This approach is particularly beneficial for background processes or command-line tools that might not have a visible user interface, making it difficult for a user to intervene if they stall. By defining a maximum wait time, you empower your application to handle unexpected situations gracefully, preventing potential deadlocks or freezes.
The following code sample demonstrates how to set a time-out for the shelled application. For this example, the time-out is set to 5 seconds (5000 milliseconds). You should adjust this value based on the expected execution time and responsiveness of the external application you are launching.
// Set a time-out value in milliseconds.
int timeOut = 5000;

// Get path to system folder, as before.
string sysFolder = Environment.GetFolderPath(Environment.SpecialFolder.System);

// Create a new process info structure.
ProcessStartInfo pInfo = new ProcessStartInfo();

// Set file name to open, same as before.
pInfo.FileName = sysFolder + @"\eula.txt";

// Start the process.
Process p = Process.Start(pInfo);

// Wait for window to finish loading.
p.WaitForInputIdle();

// Wait for the process to exit or time out. This method returns true if the
// process exited, and false if the timeout period elapsed.
bool exited = p.WaitForExit(timeOut);

// Check to see if the process is still running (i.e., it did NOT exit within the timeout).
if (!exited) // Or alternatively, if (p.HasExited == false)
{
    // Process is still running, which means the timeout elapsed.
    // Now, determine if the process is responsive or hung.
    if (p.Responding)
    {
        // Process was responding; attempt a graceful close of its main window.
        // This sends a close message, similar to clicking the 'X' button.
        p.CloseMainWindow();
        MessageBox.Show("Process was still responding and its main window was closed.", "Timeout Action");
    }
    else
    {
        // Process was not responding (hung); force the process to close.
        // This is a more drastic measure, terminating the process immediately.
        p.Kill();
        MessageBox.Show("Process was not responding and was forcefully terminated.", "Timeout Action");
    }
}
else
{
    // The process exited within the specified timeout.
    MessageBox.Show("Process exited successfully within the timeout period.", "Process Complete");
}

MessageBox.Show("Code continuing...", "Application Flow");
In this enhanced time-out example:
* int timeOut = 5000; defines the maximum wait time in milliseconds before your application takes action.
* bool exited = p.WaitForExit(timeOut); is the key difference. This method attempts to wait for the process to exit for the specified duration. It returns true if the process exits within timeOut milliseconds, and false if the timeout elapses before the process exits.
* The if (!exited) block (or if (p.HasExited == false)) checks if the process did not exit within the time limit. If it’s still running, further action is required.
* p.Responding is a property that indicates whether the user interface of the process is responding to input. This is a crucial check to differentiate between a slow-but-functioning application and a truly hung one.
* p.CloseMainWindow() attempts to gracefully close the application’s main window. This sends a close message to the application, allowing it to perform any necessary cleanup before terminating. This is the preferred method for closing a responsive application.
* p.Kill() is a more drastic measure. It terminates the process immediately, without giving it a chance to clean up. This should be used as a last resort when CloseMainWindow() fails or when the process is unresponsive (p.Responding is false).
This comprehensive approach ensures that your C# application can handle external processes gracefully, whether they complete on time, run slowly, or become entirely unresponsive. It’s a critical pattern for building robust and reliable software that interacts with the broader operating system.
Comparing CloseMainWindow() vs. Kill()
Choosing the right method to terminate an external process is crucial for maintaining system stability and ensuring data integrity. Both CloseMainWindow() and Kill() serve the purpose of ending a process, but they operate very differently and should be used in distinct scenarios. Understanding their nuances is key to responsible process management.
| Feature | Process.CloseMainWindow() |
Process.Kill() |
|---|---|---|
| Mechanism | Sends a close message to the process’s main window (e.g., WM_CLOSE). | Immediately terminates the process at the OS level. |
| Graceful Exit | Allows the application to perform cleanup, save data, and confirm exit. | No cleanup or saving is performed; the process is instantly removed. |
| Responsiveness | Requires the target process to be responsive to window messages. | Works even if the process is completely hung or unresponsive. |
| User Interaction | May prompt the user for confirmation (e.g., “Save changes?”). | No user interaction; immediate termination. |
| Best Use Case | Responsive applications that need a graceful shutdown; preferred method. | Unresponsive or hung applications; last resort for termination. |
| Impact on System | Minimal impact; allows orderly resource release. | Can leave orphaned resources or corrupted files if not used carefully. |
Using CloseMainWindow() should always be your first attempt when a graceful shutdown is desired. It respects the application’s design, allowing it to save user data, close open files, and release resources properly. Only when CloseMainWindow() fails or if the Process.Responding property indicates an unresponsive application, should Kill() be considered. Kill() is a powerful, blunt instrument that can lead to data loss or orphaned resources if not used judiciously.
Troubleshooting and Best Practices for Process Management
Effective process management in C# extends beyond simply starting and waiting for applications. It involves anticipating potential issues, implementing robust error handling, and adhering to best practices to ensure your application’s stability and reliability. When dealing with external processes, various challenges can arise, from permissions issues to unexpected program behavior.
A common dilemma is deciding between an indefinite wait and a timed wait. The primary purpose of a time-out is to prevent your application from hanging because the other application has stalled. Time-outs are generally better suited for shelled applications that perform background processing or operations where user intervention is unlikely or impossible. In these cases, your application needs to be able to recover and continue its own operations even if the external process fails to complete. For foreground applications where user interaction is expected (like a document editor), waiting indefinitely might be acceptable, as the user can manually close the application if it becomes unresponsive.
Common Pitfalls and Solutions
- Process Not Found: Ensure the
FileNameproperty inProcessStartInfopoints to a valid executable or a file type associated with an application. Always use full paths to avoid relying on the system’s PATH environment variable. - Permissions Issues: Your C# application might not have the necessary permissions to launch certain executables or write to specific directories. Consider running your C# application with elevated privileges if required, or use
pInfo.Verb = "runas";(though this will prompt UAC). - Hanging Processes: As demonstrated, use
WaitForExit(timeout)and checkHasExitedandRespondingto identify and handle hung processes. - Output Redirection: Many command-line tools provide output via standard output (stdout) or standard error (stderr). If you need to capture this output for logging or further processing, you must redirect it.
Redirecting Standard Output and Error
For command-line tools or applications that write to the console, capturing their output is often essential for monitoring progress, debugging, or retrieving results. The Process class allows you to redirect standard input, output, and error streams.
// Example: Redirecting Standard Output and Error
pInfo.FileName = "cmd.exe"; // Or any command-line tool
pInfo.Arguments = "/C dir"; // Example argument to list directory contents

pInfo.UseShellExecute = false; // Must be false to redirect I/O
pInfo.RedirectStandardOutput = true;
pInfo.RedirectStandardError = true;
pInfo.CreateNoWindow = true; // Do not create a visible window for the command prompt

Process p = new Process();
p.StartInfo = pInfo;
p.Start();

// Read the output synchronously
string output = p.StandardOutput.ReadToEnd();
string error = p.StandardError.ReadToEnd();

p.WaitForExit(); // Wait for the command to complete

MessageBox.Show($"Output:\n{output}\n\nError:\n{error}", "Command Output");
This snippet demonstrates how to configure ProcessStartInfo to redirect streams. UseShellExecute = false is critical for redirection. CreateNoWindow = true prevents a console window from appearing. After starting the process, you can read the output using p.StandardOutput.ReadToEnd() and p.StandardError.ReadToEnd(). For large outputs, consider reading line by line or asynchronously.
Asynchronous Monitoring with Process Events
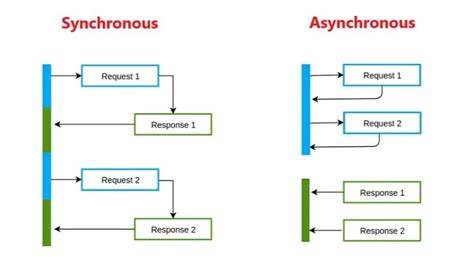
While WaitForExit is a synchronous blocking call, the Process class itself supports asynchronous monitoring through events. This is the true “asynchronous shell operations” capability, allowing your application to remain responsive while the external process runs in the background.
The Exited event is fired when a process terminates, regardless of whether it exited gracefully or crashed. You can attach an event handler to this event to perform actions once the process has completed, without blocking your main thread.
// Example: Using the Exited event for asynchronous monitoring
Process p = new Process();
p.StartInfo.FileName = "notepad.exe"; // Or any application
p.EnableRaisingEvents = true; // Crucial: must be true to raise the Exited event

// Attach an event handler
p.Exited += (sender, e) =>
{
    // This code executes when the process exits.
    // Note: This runs on a ThreadPool thread, not the UI thread.
    // If updating UI, use Control.Invoke or Dispatcher.Invoke.
    Process exitedProcess = (Process)sender;
    string message = $"Process '{exitedProcess.ProcessName}' (ID: {exitedProcess.Id}) exited.";
    if (exitedProcess.ExitCode != 0)
    {
        message += $" Exit Code: {exitedProcess.ExitCode}.";
    }
    MessageBox.Show(message, "Process Exited Asynchronously");

    // Dispose the process object after use if not needed further
    exitedProcess.Dispose();
};

p.Start();
MessageBox.Show("Notepad launched. Your application continues to run...", "Async Launch");
// Your application's main thread is NOT blocked here.
This pattern is highly recommended for long-running processes or when your application needs to perform other tasks concurrently. Remember to set p.EnableRaisingEvents = true to allow the Exited event to be raised. Also, be mindful that event handlers run on a thread pool thread, so UI updates from within these handlers require marshaling back to the UI thread.
For redirecting standard output and error asynchronously, you can use BeginOutputReadLine() and BeginErrorReadLine() in conjunction with event handlers for OutputDataReceived and ErrorDataReceived. This allows you to process the output of a console application in real-time without blocking.

State Management with Mermaid Diagram
To visualize the flow of process management with timeouts, here’s a simple state diagram using Mermaid syntax:
mermaid
graph TD
    A[Start Process] --> B{Process.WaitForExit(timeout) ?};
    B -- Timeout Expired (false) --> C{Is Process Responding?};
    C -- Yes --> D[Call CloseMainWindow()];
    C -- No --> E[Call Kill()];
    B -- Process Exited (true) --> F[Process Completed Gracefully];
    D --> G[Continue Application Flow];
    E --> G;
    F --> G;
This diagram illustrates the decision points when using WaitForExit with a timeout, guiding the choice between graceful and forceful termination based on the process’s responsiveness.
Concluding Thoughts on C# Process Management
Mastering asynchronous shell operations in C# is a powerful skill that significantly enhances your application’s capabilities. The System.Diagnostics.Process class provides a comprehensive set of tools for launching, monitoring, and controlling external applications, enabling complex integrations and automation workflows. By understanding the nuances of synchronous waiting, implementing resilient time-out mechanisms, and leveraging asynchronous event-driven approaches, you can build robust and responsive applications.
Remember to choose your waiting strategy carefully, weighing the need for immediate feedback against the risk of application hangs. Always prioritize graceful termination using CloseMainWindow() and reserve Kill() for unresponsive processes. Furthermore, consider redirecting standard streams and utilizing asynchronous events for long-running or console-based applications to maintain your application’s responsiveness. By applying these techniques, you can confidently integrate and manage external processes, making your C# applications more powerful and versatile.
We hope this comprehensive guide has shed light on the intricacies of shell operations in C#. What are your experiences with launching external processes? Have you encountered any unique challenges or discovered innovative solutions? Share your thoughts and questions in the comments below – your insights could benefit the entire developer community!
Post a Comment